Protocol - Grip Strength
- Integrated Fitness - Adult
- Integrated Fitness - Child
- Integrated Fitness - Older Adult
- Physical Functioning - Objective
- Physical Functioning - Subjective
Description
Hand grip strength is measured with a device called a hand-held dynamometer. The technician follows a script and asks the participant about hand surgery or pain that may influence the results. The technician asks the participant to sit in a chair and rest his/her arm on the table with the elbow on top of a mouse pad and arm held at a right angle. The technician adjusts the grip size of the dynamometer to the participant’s hand size and explains how the device works. The participant stands for the measures if possible. The participant squeezes the dynamometer twice during practice trials. Now, starting with the right hand, the participant is asked to squeeze as hard as possible. Three trials are attempted with each hand, with all results recorded on a form. The sum of the greatest effort (number) for each hand is the measurement used. Results should be recorded to the nearest 2 kilograms.
Specific Instructions
This protocol is specific to the Takei dynamometer. The Jamar Hydraulic Hand Dynamometer has also produced valid and reliable hand grip test results.
The grip setting on the dynamometer (adjustment for hand size) should be recorded, especially for repeated (longitudinal) measurements.
The technician should utilize the dynamometer manufacturer’s user manual for proper use and maintenance of the dynamometer and check the calibration of the device with known weights once a week.
Availability
Protocol
Description of Equipment and Supplies
The following equipment and supplies have been provided for the Muscle Strength component of NHANES.
Nonconsumable items include:
• Takei Digital Grip Strength Dynamometer, Model T.K.K.5401 (Figure 1) with hard plastic carrying case.
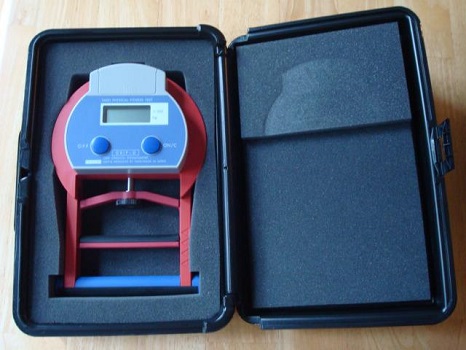
Figure 1. Dynamometer and carrying case
• 2 chairs
• Table
• Small plastic jewelry container
• Plastic dynamometer tray with foam bottom
• Foot rests
• Support pad
• Digital timer
• 4, 10 kg slotted weights and 1, 1 kg hanging base weight
• Storage container for weights
Consumable supplies include:
• Purell sanitizing wipes - pop-up bottle
• AAA batteries
• Cartoon stickers (Kids)
• Black wet erase pen
• Dynamometer repair kit (1 roll of black tape, 1 bottle of fingernail polish)
• Lotion
Room Setup Procedures
At the beginning of the stand, these procedures are followed to prepare the equipment for use. The other technician will connect the computer, keyboard, mouse, and barcode wand.
1. Clean the area (i.e., wipe countertop).
2. Remove supplies, including the plastic dynamometer tray and jewelry container from the cabinet and place them on the counter top. Store the extra supplies in the cabinet.
3. Remove both dynamometers from the carrying case and put the batteries in them.
4. Press the "ON/C" button to make sure the dynamometer comes on. If the dynamometer does not come on or the "battery low" light is on, replace the batteries.
5. After calibration is complete, place the dynamometer that will be used for the stand in the plastic dynamometer tray on the counter. Store the back-up dynamometer in the cabinet.
Dynamometer Calibration Procedures
Perform calibration at least once before conducting a series of measures.
Items needed for the calibration procedures:
Both dynamometers
Hanging calibration weights (4, 10kg slotted weights and 1, 1kg hanging base weight) (Figure 2).
Sitting box (body measures room)
Two metal rails
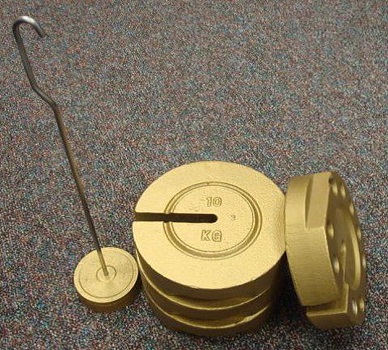
Figure 2. Calibration weights
Both dynamometers are calibrated, one at a time. Follow the procedures outlined below for calibrating the dynamometers. The QC screens indicate the tolerance ranges. The dynamometer calibration can be conducted in the body measures room for convenience.
1. Set out all items needed for calibration out and place them within reach.
2. Pick one dynamometer to be used during the stand and one to be the back-up. Calibrate the dynamometer that will be used first.
3. Turn the sitting box upside down so that the open hole is facing up.
4. Sit the hanging base weight in the center of the bottom of the box (Figure 3). (The center is marked.)
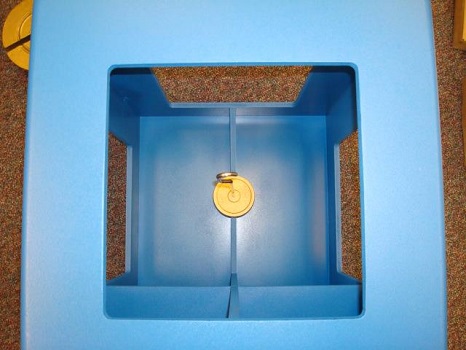
Figure 3. Hanging base weight placed in center of box
5. Adjust the dynamometer handle to the mark "5."
6. Place the two rails parallel to each other over the opening on the sitting box. The open part of the rail should sit on the sitting box and the flat part of the rail should face up.
7. Insert the metal rails in the opening by the adjustment knob on the dynamometer. Each metal rail should fit against the outer edge of the dynamometer.
8. Position the dynamometer so that it hangs directly over the stem of the hanging base weight (Figure 4).

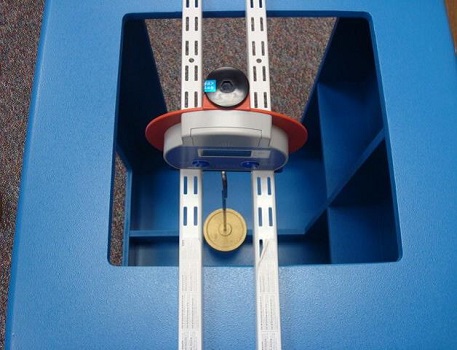
Figure 4. Positioning the dynamometer for calibration
9. When you are ready to begin hanging the weights on the dynamometer handle, ask someone to assist you. The other person will need to keep the hanging base from moving as you add the weights to it. When picking up a weight, grab it by the indentation located on each side of the weight (Figure 5). NOTE: The person holding the hanging bases in place should be careful not to pull down on the base. The dynamometer reading only goes up. Pulling down on the hanging base can give you a false reading.
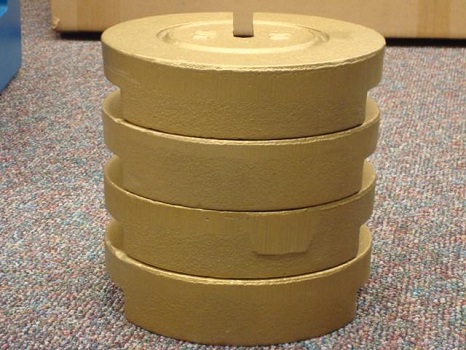
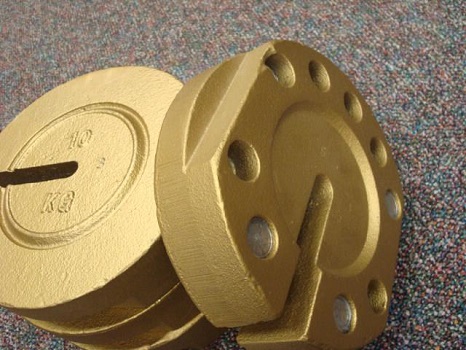
Figure 5. Indentation in weights for lifting
10. Turn the dynamometer on and carefully hang the base weight in the middle of the handle. The base weighs 1 kg; however, it is too light to register on display.
11. Carefully and gently add a 10 kg slotted weight to the base through the side of the sitting box. The stem of the base should be flush with the back of the weight’s slot (Figure 6). Ensure that the slot is centered on the stem of the base. The position of the weight will affect the reading.

Figure 6. Positioning the stem in the center of the weight’s slot
12. If the rails or the dynamometer moved as the weight was added, carefully readjust it (Figure 7).
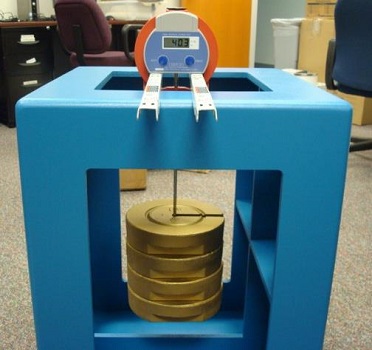

Figure 7. Weights hanging from the dynamometer handle
13. The reading must fall between 9-13 kg. This is ± 2 kg of the slotted weight (10 kg) plus the weight of the base (1 kg).
- If the reading falls within the range, record it. If the reading does not fall within the range, follow the troubleshooting tips.
14. After recording the reading, add another 10 kg slotted weight to the stem by following the procedures in steps 10 and 11. There will be a total of 2 1 kg weights hanging from the dynamometer.
- The second reading should fall within the range of 19-23 kg.
- If the measurement falls within the range, record the reading.
- If the reading does not fall within the range, follow the troubleshooting tips.
15. After recording the second reading, add two more 10 kg weights to the base in the same manner indicated in steps 10 and 11. There will now be a total of 41 kgs of weight hanging from the dynamometer.
- The third reading should fall within the range of 39-43 kg.
- If the measurement falls within the range, record the reading.
- If the reading does not fall within the range, follow the troubleshooting tips.
16. After recording the final reading, carefully remove the slotted weights and the base from the handle and turn the dynamometer off. Do not leave the weights hanging from the handle any longer than absolutely necessary.
17. Calibrate the back-up dynamometer in the same manner (steps 4-16). When recording the readings for the back-up dynamometer, write the date of calibration and the serial number of the dynamometer somewhere on the paper.
18. Store all calibration items. (Put the calibration weights back in the cardboard boxes before storing them.)
19. Turn the sitting box over and return it to its proper place.
20. Enter the calibration readings for the dynamometer that will be used during the stand into ISIS.
21. Put the calibration readings for the back-up dynamometer in the carrying case with the back-up dynamometer and store it in the cabinet in the Muscle Strength room.
Troubleshooting Tips
If any measurements for any weights are outside of the tolerance range, take all the weights off the handle and turn the dynamometer off. Turn the dynamometer back on, perform the procedure again for that weight, and verify if the result is in the acceptable range. Check the positioning of the slotted weight on the base. The stem of the base should be flush with the back of the weight’s slot and centered. The position of the weight will affect the reading.
If the result is still outside of the acceptable range, take all the weights off the handle, turn the dynamometer off, and then notify the team leader. If the team leader cannot get the reading within its acceptable range, calibrate and use the back-up dynamometer. A dynamometer cannot be used if it does not calibrate properly.
Pretest Questionnaire
Before beginning the grip strength testing procedures, the study participant is asked a series of questions to determine if he or she should be excluded from parts of the exam and to collect information on items that may influence the results. The pretest questions for SPs under the age of 12 are completed with the parent/guardian.
May I see your hands? ARE THERE ANY VISIBLE LIMITATIONS FOR EITHER HAND?
- Yes
- No
- Refused
a. Visible limitations on the right hand (CODE ALL THAT APPLY.) Missing arm, hand, or thumb
- Hand paralysis ▢
- Wearing a cast on wrist or hand ▢
- Most of hand covered by bandages (See Figure 8) ▢
- Missing fingers other than thumb or broken fingers ▢
- Other (specify) _____________________________________________ ▢
- No visible limitation for right hand ▢
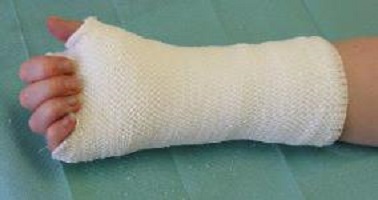
Figure 8. Example of hand mostly covered by bandages
b. Visible limitations on the left hand (CODE ALL THAT APPLY.) ▢
- Missing arm, hand, or thumb ▢
- Hand paralysis ▢
- Wearing a cast on wrist or hand ▢
- Most of hand covered by bandages (See Figure 3 for examples.) ▢
- Missing fingers other than thumb or broken fingers ▢
- Other (specify) _____________________________________________
- No visible limitation for left hand ▢
"Wearing a cast on wrist or hand," "Most hand covered by bandages," or "Other (specify)," he or she will be excluded from testing that specific hand. If an SP is missing fingers other than the thumb on the right or left hand, he or she is still eligible to complete the exam. If there is a visible physical limitation that excludes both hands or if the SP refuses to let you see his or her hands, the exam will end.
2. Have you had any surgery on your hands or wrists in the past three months?
- Yes ▢
- No ▢
- Refused ▢
- Don’t know ▢
a. Which hand or wrist was the surgery on?
- Right hand/wrist ▢
- Left hand/wrist ▢
- Both hands/wrist ▢
- Refused ▢
- Don’t know ▢
If the SP has had surgery on his or her hands or wrists in the past 3 months the hand(s) or wrist(s) indicated will be excluded from the exam. If the SP has had any other surgeries that will affect his or her ability to complete the test, it will be recorded in question 3.
3. In this test, we will be asking you to squeeze this instrument as hard as you can. Do you know of any reason why you should not do the test? (DO NOT INCLUDE EXCLUSIONS PREVIOUSLY RECORDED.)
- No ▢
- Yes; should not test right hand ▢
- Yes; should not test left hand ▢
- Yes; should not test either hand ▢
- Refused ▢
- Don’t know a. Specify reason ___________________________________________________
This is the last exclusion question. Only record exclusions that were not recorded in the two previous questions. If the SP indicates that one or both hands should not be tested, you will be prompted to specify a reason. Type the reason the SP gives into the computer.
4. Have you ever had surgery on your hands or wrists for arthritis or carpal tunnel syndrome?
- Yes ▢
- No ▢
- Refused ▢
- Don’t know ▢
a. Which hand or wrist was the surgery on?
- Right hand/wrist ▢
- Left hand/wrist ▢
- Both hands/wrist ▢
- Refused ▢
- Don’t know ▢
If the SP has had surgery on his or her hands or wrists for arthritis or carpal tunnel syndrome, indicate which hand(s) or wrist(s).
5. Have you had any pain, aching or stiffness in your right hand in the past 7 days?
- Yes ▢
- No ▢
- Refused ▢
- Don’t know ▢
a. Is the pain, aching or stiffness in your right hand caused by arthritis, tendonitis, or carpal tunnel syndrome?
- Yes ▢
- No ▢
- Refused ▢
- Don’t know ▢
b. Has the pain, aching or stiffness in your right hand gotten worse in the past 7 days?
- Yes ▢
- No ▢
- Refused ▢
- Don’t know ▢
This set of questions is only asked to the SP if his or her right hand has been determined as eligible for the grip test. If the SP’s right hand is excluded from the test, the system will block these questions and the entry fields will be grayed out on the screen.
If the SP has had pain, aching or stiffness in his or her right hand in the past 7 days, ask two follow-up questions. The first follow-up question asks whether the pain, aching, or stiffness is caused by arthritis, tendonitis, or carpal tunnel syndrome. The second question is used to ascertain whether there is any acute flare-up on the SP’s right hand.
6. Have you had any pain, aching or stiffness in your left hand in the past 7 days?
- Yes ▢
- No ▢
- Refused ▢
- Don’t know ▢
a. Is the pain, aching or stiffness in your left hand caused by arthritis, tendonitis, or carpal tunnel syndrome?
- Yes ▢
- No ▢
- Refused ▢
- Don’t know ▢
b. Has the pain, aching or stiffness in your left hand gotten worse in the past 7 days?
- Yes ▢
- No ▢
- Refused ▢
- Don’t know
The same questions are repeated here for the left hand. Similar to the previous set of questions, these questions are only asked to the SP if his or her left hand has been determined as eligible for the grip test. If the SP’s left hand is excluded from the test, the system will block these questions and the entry fields will be grayed out on the screen.
7. Are you right-handed, left-handed, or do you use both hands equally?
- Right-handed ▢
- Left-handed ▢
- Use both hands equally ▢
- Refused ▢
- Don’t know ▢
This question is used to identify the SP’s dominant hand. This information will be used to determine which hand the test will start with. If the SP has trouble identifying his or her dominant hand, probe for his or her writing hand. For children 6-11 years old, if the response is "Don’t know," ask the child SP directly.
Handgrip Testing Procedures
Once all of the pretest questions have been completed, prepare the SP for the test. The SP will remain seated during the preparation and warm-up.
Ask the SP to remove hand and wrist jewelry. Hand and wrist jewelry could interfere with the SP’s ability to grip the dynamometer or become damaged from squeezing the dynamometer. To prevent damaging the SP’s jewelry, ask the SP to remove hand and wrist jewelry and place it in the small plastic container on the counter. If the SP does not want to remove his or her jewelry, the test will still continue.
To loosen up the hands and fingers, the SP will complete two warm-up exercises. The warm-up exercises include shaking both hands three times and bending and stretching all fingers three times. Demonstrate each exercise and ask the SP to do the exercise.
Adjusting the Dynamometer Grip Size
The SP will remain seated when the dynamometer is adjusted for grip size. Tell the SP "Next I am going to adjust this device to fit your hand(s). Please hold this with your (right/left) hand." The screen indicates if the right, left, or both hands will be tested. If one hand has previously been excluded, the message on the screen will indicate which hand will be tested as a reminder that you only need to fit one hand. If both hands will be tested, the pretest screen also indicates which hand to fit first (Exhibit 3). The starting hand is always fitted first.
Place the support pad on the SP’s lap. Set the dynamometer on the pad and place it in the SP’s hand that will be fitted first with the front of the dynamometer facing out as indicated in Figure 2. Adjust the grip to the SP’s hand size.

Figure 9. Dynamometer resting on support pad
When adjusting the grip size, follow these guidelines:
Adjust the grip size of the dynamometer until the second joint of the index finger is at a 90 degree angle on the handle (90˚ flexion between proximal and middle phalangeal joint). See Figure 3. When adjusting the grip size, the hand should be in line with the wrist and forearm.
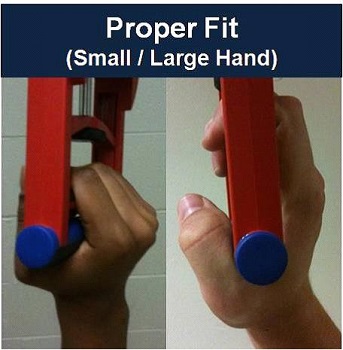
Figure 10. Proper handgrip fit
If the second joint of the index finger is less than 90 degrees, increase the grip size by turning the adjustment knob clockwise. a. If the SP’s finger nails are hitting the palm, adjust the dynamometer to a larger grip size.
If the second joint of the index finger is more than 90 degrees, decrease the grip size by turning the adjustment knob counterclockwise. a. A line on the handle indicates the minimum grip size. The handle should never be placed lower than this line (Figure 4).
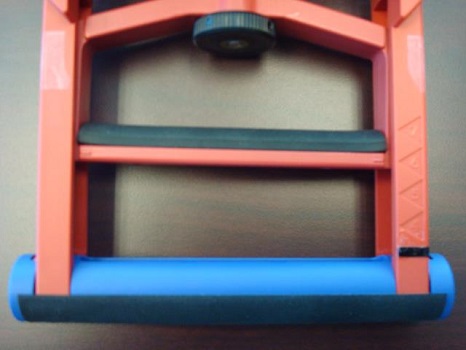
Figure 11. Minimum grip size line
When adjusting the grip size, the tech will look down on the SP’s hand to see the angle of the index finger (Figure 12).
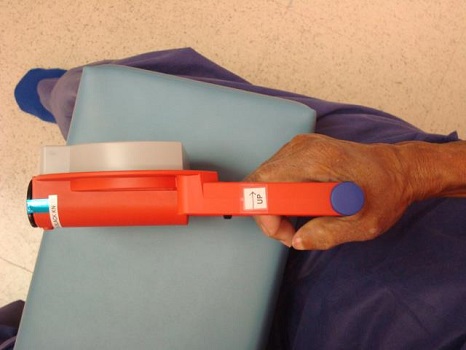
Figure 12. Checking angle of index finger
If the second joint of the SP’s index finger cannot bend enough to achieve the 90 degree angle for any reason (i.e., arthritis, long nails, large or small hand), adjust the grip size to be as close to the 90 degree angle as you can and proceed with the exam.
On the pretest screen, indicate whether or not the SP was able to bend his or her index finger to achieve the 90 degree angle
If the SP was not able to achieve a 90 degree angle at the second joint of the index finger, specify the hand (right, left, or both) in the drop-down box and enter the reason why in the "Comments" field (i.e., both hands too small, both hands too large, R arthritis, L nails too long).
Record any additional comments regarding the SP’s hand or fingers in the "Comments" field (Exhibits 3-4). Use the following abbreviations to record your comments:
• R: right hand - use capitalized letter "R" to refer to the right hand
• L: left hand - use capitalized letter "L" to refer to the left hand
• D: digit - use 1D, 2D, 3D, 4D, and 5D to refer thumb, index finger, middle finger, ring finger, and pinky, respectively
• P: phalange
For example, "missing 1P in L2D" means "missing 1 phalange in the index finger on left hand."
After the grip size is adjusted for the first test hand, put the dynamometer in the opposite hand in the same manner. This will be the practice hand. Check the grip to see if the same grip size fits both hands. Most of the time, the grip size will be the same for both hands. If the grip size is not the same for both hands, follow the guidelines below to make adjustments:
Use the wet erase pen to mark the placement of the handle for the first hand. The mark should be made on the back of the dynamometer inline with the indicator mark on the handle (Figure 13).
Adjust the grip size for the second hand (the practice hand). Mark the handle placement for the second hand. Proceed with the demonstration.
Make proper adjustments for each hand between each of the six measurements.
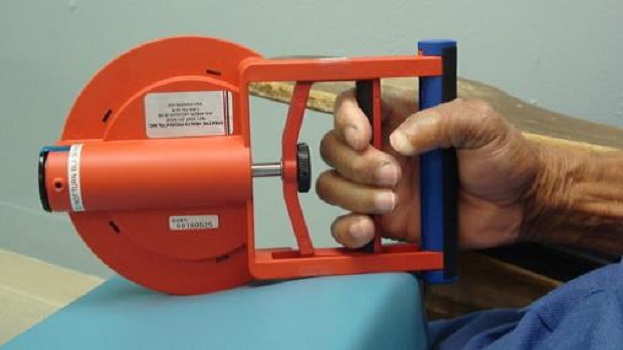
Figure 13. Proper marking of the handle placement
The SP will only perform the exam in the seated position if he or she cannot stand unassisted (see section for individuals who cannot stand unassisted). Record if the SP will stand or sit for the exam on the pretest screen. If the exam will be completed in a sitting position, the system will prompt you to indicate whether either of the SP’s feet can apply force to the ground. If it is not obvious, check the SP’s leg function by placing your hand under the SP’s foot/feet and ask the SP to apply force to your hand. The test will still continue regardless of the SP’s leg function; however, this information is important for data analysis.
Tech Demonstration of Exam
After the grip size is adjusted, take the dynamometer from the SP and explain the exam to the SP using the suggested scripts below. During the demonstration, the SP can remain sitting while you stand to demonstrate.
SUGGESTED SCRIPT:
For the test, I will ask you to squeeze this hand grip as hard as you can. You will stand with your feet hip width apart and your toes pointing forward like this. You will hold your hand so that it’s not touching your body and squeeze the handle. I want you to stand tall and try not to lean when you squeeze. You will take a breath in, then blow out while you squeeze. You will squeeze as hard as you can until you can’t squeeze any harder. Like this.
(Do the squeeze demo now.)
We will test each hand 3 times.
While explaining the test to the SP, demonstrate the test as indicated below.
• Grasp the dynamometer between the fingers and the palm at the base of the thumb.
• Hold the dynamometer in line with the forearm at the thigh level so that it’s not touching the body.
• Emphasize that the SP should stand with the feet hip width apart with toes pointing forward.
• Instruct the SP that neither the hand nor dynamometer should touch the body or any other object during the test.
• Instruct the SP not to hold his or her breath. (Take a breath in before starting the squeeze, then blow out the air during the squeeze.)
• Emphasize the quickness and hardness of the squeezing motion (with fist slightly shaking).
Figure 14 shows an example of the proper testing form. Notice that the elbow is straight and fully extended at the side. The head is straight and the eyes are looking straight ahead. The wrist is not flexed or extended and the feet are hip width apart and even.
If the SP will perform the test in a seated position because he or she cannot stand unassisted for the entire grip strength portion of the test, the test should be demonstrated in the seated position.
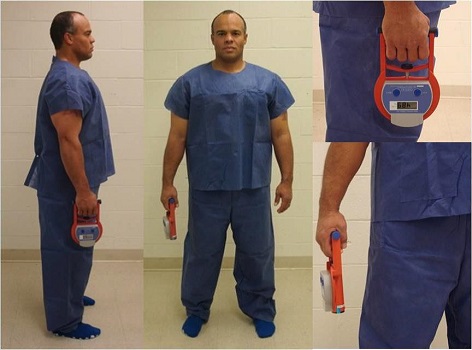
Figure 14. Proper testing form
Positioning the SP and Conducting the Practice Trial
After completing the demonstration, you are ready to conduct a practice trial on one hand with the SP to determine if the procedure is understood. This should only be done at a submaximal effort. The hand to be used for the practice trial is indicated on the data collection screen. It is usually the opposite hand that you will start the test on. If the SP only has one hand that is eligible for the test, the practice trial will be on that hand with a reminder on the screen to wait 60 seconds before starting the test. Use the digital timer provided to make sure you wait 60 seconds before you start the test.
Have the SP stand unassisted. Fold the sitting bench back to the wall position. See later section for positioning SPs who cannot perform the test standing. Follow the steps below to position the SP for the trial.
- Make sure the SP is in the proper stance.
- Standing with the feet hip width apart and even, toes pointing forward
- Knees comfortable but not bent
- Shoulders back and chest up
- Head is level
- Eyes straight ahead
- Arm at side with palm facing leg
- Turn the dynamometer on by pressing the "ON/C" button.
- Hand the dynamometer to the SP.
- SP will grasp the dynamometer between the fingers and the palm at the base of the thumb.
- SP will hold the dynamometer in line with the forearm at the thigh level so that it’s not touching the body.
- Remind the SP that neither the hand nor dynamometer should touch the body or any other object during the test.
After the SP is positioned correctly, remind the SP to only squeeze the dynamometer at a submaximal effort and not to hold his or her breath. Below is the suggested script for this practice:
Suggested Script:
"Now try it once just to get the feel of it. For this practice, just squeeze gently. Ready, take a breath in, let it out, squeeze gently."
Some natural movement or change in the SP’s stance may occur when the SP squeezes the handle. This is okay as long as the SP doesn’t completely lose the testing form. See Section 3.6 for examples of when the test would need to be repeated.
Positioning SPs Who Cannot Stand Unassisted
If an SP cannot stand unassisted for the entire grip strength portion of the exam, he or she can still perform the test but in the seated position. Both feet should be placed on the ground. If necessary, place SP’s feet on the stackable foot rests to allow the feet to apply force to the surface. If the SP does not have function in his or her legs (i.e., paralyzed), it is okay to leave the nonfunctional foot or feet off of the ground or in the foot rest of the wheelchair. Ensure that the SP is sitting straight up on the bench (back not resting against the wall) and not holding on to anything. The arm should be at the side (Figure 15). If the SP is in a wheelchair, it is okay if the arm is touching the arm rest; however, the SP should not use the arm rest for leverage. If the SP is not able to obtain the proper testing form in the seated position, he or she will be excluded from the grip test portion of the exam.
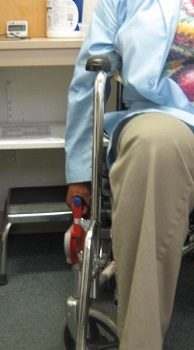
Figure 15. Arm position for seated exam
Start the Exam
After the practice trial is completed and the SP understands the test, you are ready to begin the exam. For the exam, each hand will be tested three times, alternating hands between trials with a 60-second rest between measurements on the same hand. The order of the tests is randomized by the SP’s ID number and the SP’s dominant hand (i.e., odd number ID starts with his or her dominant hand; even number ID starts with his or her nondominant hand; people with unidentifiable dominant hand randomly assigned by ID).
Always double check the testing position before each test. SPs often move their feet between each test so it is important to double check the SP’s feet each time. Press the "ON/C" button (Figure 16) on the dynamometer before the start of each test. This will reset the dynamometer reading to zero and disable the dynamometer from calculating and display the average grip strength reading automatically. For each test, once the SP finishes squeezing, take the dynamometer from the SP and enter the reading into the computer application. The 60-second timer on the screen will start to countdown. Do not return the dynamometer to the SP until all 60 seconds have elapsed. Remember to set the dynamometer to zero by pressing the "ON/C" button prior to returning it to the SP.
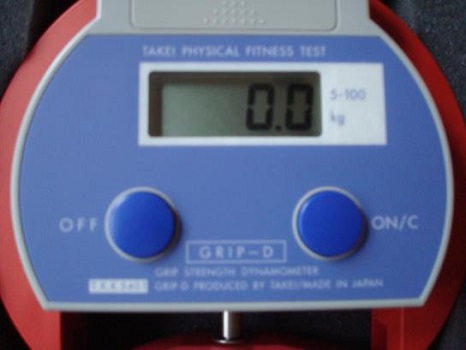
Figure 16. Dynamometer "ON/C" button
Reminder: If the SP’s grip size was different between their two hands, you will need to adjust the handle size each time based on the marks you made earlier.
Coaching the SP
When the SP is squeezing the dynamometer, encourage him or her by using a neutral, instructive, and upbeat tone. The SP will squeeze the dynamometer as hard as possible. Instruct the SP by saying:
Suggested Script:
When I say "squeeze," squeeze as hard as you can until you can’t squeeze any harder. Remember to blow out when you squeeze.
READY, TAKE A BREATH IN, LET IT OUT, SQUEEZE!
SQUEEZE AS HARD AS YOU CAN UNTIL YOU CAN’T SQUEEZE ANY HARDER.
After the first squeeze, do not repeat the entire coaching script unless it is necessary. For subsequent squeezes, say:
READY, TAKE A BREATH IN, LET IT OUT, SQUEEZE!
SQUEEZE AS HARD AS YOU CAN UNTIL YOU CAN’T SQUEEZE ANY HARDER.
SPs may have different coaching needs. It is acceptable to adjust your coaching accordingly. For example, if the SP is holding his or her breath or starting to lean while squeezing, you may need to remind the SP to breathe out or to stand tall.
Record the results into the data collection instrument.
Remove batteries from dynamometers when finished for the day.
Unusual Testing Situations
If an SP cannot stand up completely straight (i.e., osteoporosis), the exam will continue if this is normal for the SP. The SP will stand as straight as possible.
If the SP bends or twists his or her body while squeezing the dynamometer (Figure 17), do not record the results. Illustrate again the proper position to the SP and repeat the measurement. If this is the first test of the exam, change the starting hand field and start the exam on the other hand. Use the digital timer to make sure you wait 60 seconds before testing the hand again. If this is not the first test, move on and test the opposite hand, then come back and repeat the measurement. It is important to wait 60 seconds between measurements on the same hand so use the digital timer whenever necessary to make sure you wait the allotted time.
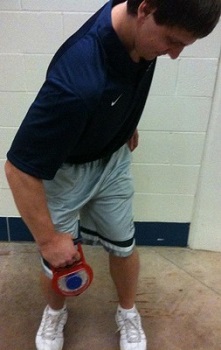
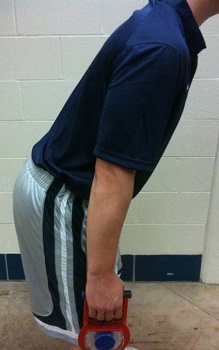
Figure 17. Positioning mistakes
Some SPs may experience pain due to arthritis or tendonitis when squeezing the dynamometer. Make sure the pain is not caused by inappropriate grip size or grip position. Encourage the SP to complete the exam. Grip strength test is a common functional assessment that is routinely used in clinical setting for arthritis, tendonitis, or carpal tunnel syndrome patients. There should be no more than minimal risk associated with the grip test. If the SP experiences pain when squeezing the dynamometer and cannot continue the test, stop the test on that hand.
If the dynamometer is dropped, swap it out for another dynamometer.
Personnel and Training Required
Technician trained to properly maintain and check the calibration of a dynamometer. The technician should read the dynamometer user’s manual and the study procedures manual and practice the grip strength test with volunteers. Problems with the device should be directed to an expert or QC officer.
Equipment Needs
Takei Digital Grip Strength Dynamometer, Model T.K.K.5401, which registers maximum kilograms of force during trial, with adjustable hand grip.
Other equipment needed includes:
Standard chair
Table (moveable tray table preferred)
Mouse pad
Requirements
| Requirement Category | Required |
|---|---|
| Major equipment | No |
| Specialized training | No |
| Specialized requirements for biospecimen collection | No |
| Average time of greater than 15 minutes in an unaffected individual | No |
Mode of Administration
Physical Measurement
Lifestage
Child, Adolescent, Adult, Senior
Participants
Age 6+
Selection Rationale
This hand grip protocol is relatively easy to administer and was used during a major epidemiology study of more than 5,000 participants. The protocol described was used in National Health and Nutrition Examination Survey (NHANES) with participants ages 6-80+ years. Testing in the standing position has been recommended as being more representative of total body strength than tests with the elbow flexed.
Language
English
Standards
| Standard | Name | ID | Source |
|---|---|---|---|
| Human Phenotype Ontology | Muscle Weakness | HP:0001324 | HPO |
| caDSR Form | PhenX PX150302 - Muscle Strength | 6170868 | caDSR Form |
Derived Variables
Combined grip strength - Sum of maximal value from each hand.
Process and Review
The Expert Review Panel #1 reviewed the measures in the Anthropometrics, Diabetes, Physical Activity and Physical Fitness, and Nutrition and Dietary Supplements domains.
Guidance from the ERP includes:
• Replaced the protocol (different source)
Back-compatible: no changes to Data Dictionary
Previous version in Toolkit archive (link)
Protocol Name from Source
National Health and Nutrition Examination Survey (NHANES), Muscle Strength Procedures Manual, 2013-2014
Source
Centers for Disease Control and Prevention (CDC), National Center for Health Statistics (NCHS). (2013-14). National Health and Nutrition Examination Survey Muscle Strength Procedures Manual. Hyattsville, MD: U.S. Department of Health and Human Services, Centers for Disease Control and Prevention.
General References
Ervin, R. B., Fryar, C. D., Wang, C. Y., Miller, I. M., & Ogden, C. L. (2014). Strength and body weight in US children and adolescents. Pediatrics, 134(3), e782-789.
Luna-Heredia, E., Martin-Pena, G., & Ruiz-Galiana, J. (2005). Handgrip dynamometry in healthy adults. Clinical Nutrition, 24(2), 250-258.
Newman, A. B., Haggerty, C. L., Goodpaster, B., Harris, T., Kritchevsky, S., Nevitt, M., Miles, T. P., & Visser, M.; Health Aging And Body Composition Research Group (2003). Strength and muscle quality in a well-functioning cohort of older adults: The Health, Aging and Body Composition Study. Journal of the American Geriatric Society, 51(3), 323-330.
Newman, A. B., Kupelian, V., Visser, M., Simonsick, E. M., Goodpaster, B. H., Kritchevsky, S. B., Tylavsky, F. A., Rubin, S. M., & Harris, T. B. (2006). Strength, but not muscle mass, is associated with mortality in the health, aging and body composition study cohort. Journals of Gerontology Series A: Biological Sciences and Medical Sciences, 61(1), 72-77.
Rantanen, T., Harris, T., Leveille, S. G., Visser, M., Foley, D., Masaki, K., & Guralnik, J. M. (2000). Muscle strength and body mass index as long-term predictors of mortality in initially healthy men. Journals of Gerontology Series A: Biological Sciences and Medical Sciences, 55(3), M168-M173.
Rantanen, T., Guralnik, J. M., Foley, D., Masaki, K., Leveille, S., Curb, J. D., & White, L. (1999). Midlife hand grip strength as a predictor of old age disability. Journal of the American Medical Association, 281(6), 558-560.
Schlüssel, M. M., dos Anjos, L. A., de Vasconcellos, M. T., & Kac, G. (2008). Reference values of handgrip dynamometry of healthy adults: A population-based study. Clinical Nutrition, 27(4), 601-607.
Trudeau, F., Laurencelle, L., & Shephard, R. J. (2009). Is fitness level in childhood associated with physical activity level as an adult? Pediatric Exercise Science, 21(3), 329-338.
Wind, A. E., Takken, T., Helders, P. J., & Engelbert, R. H. (2010). Is grip strength a predictor for total muscle strength in healthy children, adolescents, and young adults? European Journal of Pediatrics, 169(3), 281-287.
Protocol ID
150302
Variables
Export Variables| Variable Name | Variable ID | Variable Description | dbGaP Mapping | |
|---|---|---|---|---|
| PX150302_MuscleStrength_Arthiritis_CarpalTunnel | ||||
| PX150302260000 | Have you ever had surgery on your hands or more | N/A | ||
| PX150302_MuscleStrength_Arthiritis_CarpalTunnel_Surgery | ||||
| PX150302270000 | Which hand or wrist was the surgery on? | N/A | ||
| PX150302_MuscleStrength_Calibration_Backup_Weight10 | ||||
| PX150302110000 | When following the calibration steps, when more | N/A | ||
| PX150302_MuscleStrength_Calibration_Backup_Weight10_Reading | ||||
| PX150302120000 | If yes, what is the weight reading of the more | N/A | ||
| PX150302_MuscleStrength_Calibration_Backup_Weight20 | ||||
| PX150302130000 | When following the calibration steps, when more | N/A | ||
| PX150302_MuscleStrength_Calibration_Backup_Weight20_Reading | ||||
| PX150302140000 | If yes, what is the weight reading of the more | N/A | ||
| PX150302_MuscleStrength_Calibration_Backup_Weight40 | ||||
| PX150302150000 | When following the calibration steps, when more | N/A | ||
| PX150302_MuscleStrength_Calibration_Backup_Weight40_Reading | ||||
| PX150302160000 | If yes, what is the weight reading of the more | N/A | ||
| PX150302_MuscleStrength_Calibration_Weight10 | ||||
| PX150302040000 | When following the calibration steps, when more | N/A | ||
| PX150302_MuscleStrength_Calibration_Weight10_Reading | ||||
| PX150302050000 | If yes, what is the weight reading of the more | N/A | ||
| PX150302_MuscleStrength_Calibration_Weight20 | ||||
| PX150302060000 | When following the calibration steps, when more | N/A | ||
| PX150302_MuscleStrength_Calibration_Weight20_Reading | ||||
| PX150302070000 | If yes, what is the weight reading of the more | N/A | ||
| PX150302_MuscleStrength_Calibration_Weight40 | ||||
| PX150302080000 | When following the calibration steps, when more | N/A | ||
| PX150302_MuscleStrength_Calibration_Weight40_Reading | ||||
| PX150302090000 | If yes, what is the weight reading of the more | N/A | ||
| PX150302_MuscleStrength_Dexterity | ||||
| PX150302340000 | Are you right-handed, left-handed, or do you more | Variable Mapping | ||
| PX150302_MuscleStrength_Disclaimer | ||||
| PX150302240000 | In this test, we will be asking you to more | N/A | ||
| PX150302_MuscleStrength_Disclaimer_Reason | ||||
| PX150302250000 | In this test, we will be asking you to more | N/A | ||
| PX150302_MuscleStrength_Grip_Setting | ||||
| PX150302020000 | What grip setting on the dynamometer is more | N/A | ||
| PX150302_MuscleStrength_Instrument_Calibration | ||||
| PX150302030000 | Has the examiner checked the calibration of more | N/A | ||
| PX150302_MuscleStrength_Instrument_Calibration_Backup | ||||
| PX150302100000 | Has the examiner checked the calibration of more | N/A | ||
| PX150302_MuscleStrength_Pain_Left | ||||
| PX150302310000 | Have you had any pain, aching or stiffness more | N/A | ||
| PX150302_MuscleStrength_Pain_Left_Causes | ||||
| PX150302320000 | Is the pain, aching or stiffness in your more | N/A | ||
| PX150302_MuscleStrength_Pain_Right | ||||
| PX150302280000 | Have you had any pain, aching or stiffness more | N/A | ||
| PX150302_MuscleStrength_Pain_Right_Causes | ||||
| PX150302290000 | Is the pain, aching or stiffness in your more | N/A | ||
| PX150302_MuscleStrength_Pain_Worsened_Left | ||||
| PX150302330000 | Has the pain, aching or stiffness in your more | N/A | ||
| PX150302_MuscleStrength_Pain_Worsened_Right | ||||
| PX150302300000 | Has the pain, aching or stiffness in your more | N/A | ||
| PX150302_MuscleStrength_Results | ||||
| PX150302380000 | What is the result of the dynamometer test? | N/A | ||
| PX150302_MuscleStrength_Surgery | ||||
| PX150302220000 | Have you had any surgery on your hands or more | N/A | ||
| PX150302_MuscleStrength_Surgery_WhichHand | ||||
| PX150302230000 | Which hand or wrist was the surgery on? | N/A | ||
| PX150302_MuscleStrength_UnableTo_Constrict | ||||
| PX150302360000 | If the subject is not able to achieve 90 more | N/A | ||
| PX150302_MuscleStrength_UnableTo_Constrict_Reason | ||||
| PX150302370000 | If the subject is not able to achieve 90 more | N/A | ||
| PX150302_MuscleStrength_Visible_Limitations | ||||
| PX150302170000 | Are there any visible limitations for either hand? | N/A | ||
| PX150302_MuscleStrength_Visible_Limitations_Left | ||||
| PX150302200000 | What best describes the visible limitations more | N/A | ||
| PX150302_MuscleStrength_Visible_Limitations_Left_Other | ||||
| PX150302210000 | What best describes the visible limitations more | N/A | ||
| PX150302_MuscleStrength_Visible_Limitations_Right | ||||
| PX150302180000 | What best describes the visible limitations more | N/A | ||
| PX150302_MuscleStrength_Visible_Limitations_Right_Other | ||||
| PX150302190000 | What best describes the visible limitations more | N/A | ||
| PX150302_MuscleStrength_Warmup | ||||
| PX150302350000 | During warm up, was the subject able to more | N/A | ||
| PX150302_MuscleStrength_Which_Instrument | ||||
| PX150302010000 | Which dynamometer is being used? | N/A | ||
Measure Name
Grip Strength
Release Date
October 1, 2015
Definition
A measure of maximum hand grip strength used to assess a person’s overall muscle strength.
Purpose
Poor muscle strength has been associated with disability, poor health status, and an increase in mortality.
Keywords
Physical Activity and Physical Fitness, exercise, grip strength, hand strength, dynamometer, NHANES, gerontology, aging, geriatrics
Measure Protocols
| Protocol ID | Protocol Name |
|---|---|
| 150302 | Grip Strength |
Publications
Ross, J. M., et al. (2022) The effects of cannabis use on physical health: A co-twin control study. Drug and Alcohol Dependence. 2022 January; 230: 109200. doi: 10.1016/j.drugalcdep.2021.109200
Webel, A. R., et al. (2019) Relationship of HIV Status and Fatigue, Cardiorespiratory Fitness, Myokines, and Physical Activity. Janac-Journal of the Association of Nurses in Aids. 2019 July; 30(4): 392-404. doi: 10.1097/JNC.0000000000000022
Sapkota, B. R., et al. (2016) Genome-wide association study of 25(OH) Vitamin D concentrations in Punjabi Sikhs: Results of the Asian Indian diabetic heart study. J Steroid Biochem Mol Biol. 2016 April; 158: 149-156. doi: 10.1016/j.jsbmb.2015.12.014